Its quite a long time ago I wanna make a tutorial on making SE themes but I have not much time.. So today I have a strong feeling to do it..n here I am busy typing all these nonsense as U may call it..hehe..
I m a member of Zedge community.. Its a website where U can download mobile themes, ringtones n others for free (but U need to register first).. I ve made some themes n edited some wallpapers for Zedge since there s not much of them for Yari..especially, I want a theme which based on pink color n butterflies coz I m very fond of them..
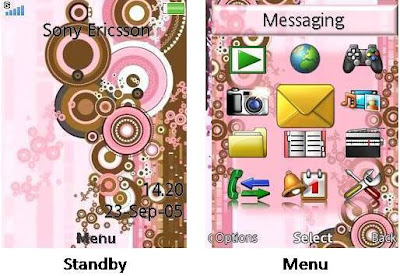
Here s some themes that I ve made..

 Software or applications or websites required as simple as MO Power Point (MOPP) (preferably 2007 coz it has many features), MO Picture Manager (MOPM) (mainly for cropping the image), Ulead Photo Express (I use it) or any picture editor software like adobe photoshop or others (for picture editing)(optional)..
Some steps that U need to follow in order to make a theme that suits ur taste..
1) Of course, U need to download the software first..I use SE theme creator..n install it..here s the link
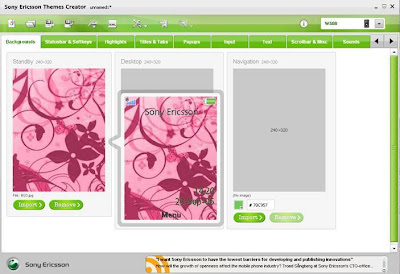
2) After U open the software, U can find this interface..

From the pic, U can see that it has provided sections for background, bars & keys, highlights, titles & tabs n many more.. And for each of them, it has put the needed picture size, for example: standby (240x320), desktop (240x320) n etc.
3) To start, U need to select SE mobile model that U wanna make the theme for which is located at upper right of the pic..
4) After that, U need to find a wallpaper or any pictures that have resolutions bigger than the size needed..usually I find it from photobucket or simply u can
5) Then, U need to crop the image by using MOPM to size of 240x320..
(Open the image by using MOPM --> choose edit pictures tab --> choose crop --> under the new picture dimensions, U can see the pixels that U ve cropped --> crop to 240x320 pixels)
* Choose save as to save the pic coz U may need the pic again from different angle..
for example:
 6) Then, U can put the pic in the standby by clicking import.. If U hover the mouse over the standby area, U can see the preview for the theme..
7) U can complete the other areas such as desktop n navigation by using the same steps.. U may choose different parts of the pic so that it wont look the same throughout the theme..
8) The steps above are also applicable for bars & keys, highlights or etc..the concept is the same but different in size..
9) To make a nicer effect on the bars & tabs, U can use MOPP.. However, it can b very tedious.. For example:
 U need to create a plain background (or any background also can do, depends on ur own creativity) --> Crop the background by using MOPM to desired size, for instance, for popup title under titles & tabs section, the size needed is 212x39 --> then copy the image to MOPP n create the effect by using picture effect --> then save the image as JPEG format --> crop again the image by using MOPM to 212x39 n save the pic..
Besides that, if U want a cuter effect, where U can put an image on the tab, U can use photo editor software, for me, I use Ulead..
 10) U can edit the color of the text or input as U desired by using this software, also the ringtones n message alert..
11) If U want a background with an animation, U can upload the cropped pic to Blingee website (U need to register first).. yes U ll have an animation but along with it, there s a Blingee logo which doesnt look very cool..
 Supposedly, the added stars will be lip lap lip lap anak mami but since this is JPEG instead of GIF format so it looks static..
To reduce the visibleness of the logo, U can upload the blingeed pic to imikimi website..U still have the logo from imikimi but at least its not that visible as blingee..
 Did U notice the small n white imikimi logo at the lower left side?
* In order to do this, U need to upload to Blingee longer pic size, from 240x320 pixels, mayb to 240x370 so that later, the Blingee logo is placed at the lower unused part n U can cropped the Blingee logo by using imikimi..so that it ll not affect the picture.. By using imikimi, U can cropped the image without affecting the animation made by Blingee..
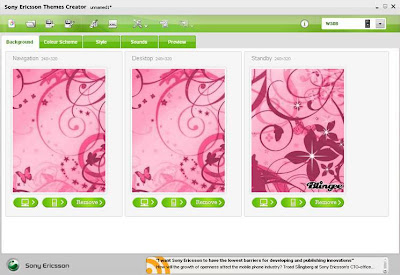
Another way to create a theme for ur mobile but in easier way is by choosing the advance editor.. Here s the interface..
 1) From here, U can choose the color for ur theme based on ur background color.. U also can choose different style (multi @ rounded @ tech) that may suit ur taste.. This is much2 simpler way to do ur own theme..for example:
 2) U can change the color a bit by altering the color scheme chosen based on try n error n concept..
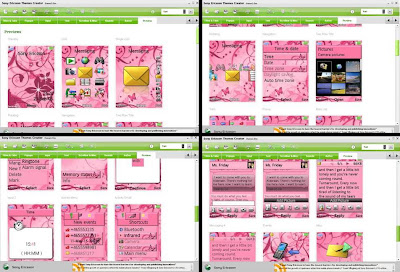
Finally, for both hard n simple steps, U can click the preview for ur finished theme --> save it --> bluetooth to ur mobile --> enjoy the theme --> hehe..
The preview:

This is my way on doing the themes.. other people may have their own techniques.. Mine is the classic way..
Anyway, I hope this tutorial helps a bit..
0 wrote back:
Post a Comment